属性透传:优雅的属性继承机制
Q: 什么是属性透传?它在什么场景下发挥作用?
A: 属性透传(Fallthrough Attributes)指的是那些没有被组件声明为 props、emits 或自定义事件的属性,依然能自动传递给子组件的根元素。典型的例子包括 class、style 和 id。
快速上手
假设有一个 A 组件:
<template>
  <div>
    <p>A组件</p>
  </div>
</template>
在父组件中传入未声明为 props 的属性:
<template>
  <A id="a" class="aa" data-test="test" />
</template>
渲染结果是这些属性自动「穿透」到了 A 组件的根元素上:
<div id="a" class="aa" data-test="test">
  <p>A组件</p>
</div>
核心细节
1. class 和 style 的合并
如果子组件的根元素已有 class 或 style 属性,它会和父组件透传过来的值自动合并。而对于其他同名属性,子组件上的值会被忽略,以父组件透传的值为准。
2. 深层组件继承
当组件在其根节点上渲染另一个组件时,属性会继续透传下去。但深层透传不包括被中间组件声明过的 props 或 emits 相关的属性——它们在中间组件就被「消费」了。
3. 禁用属性透传
如果不想让属性自动透传到根元素,可以使用 defineOptions 禁用:
defineOptions({
  inheritAttrs: false,
});
然后通过 $attrs 手动指定透传目标:
<div>
  <p v-bind="$attrs">A组件</p>
</div>
有两个注意点:
- 透传 attributes 在 JS 中保留原始大小写,如
foo-bar需通过$attrs['foo-bar']访问。 @click事件监听器会暴露为$attrs.onClick函数。
4. 多根节点属性透传
与单根节点不同,多根节点组件没有自动透传行为,Vue 会抛出警告。需通过 $attrs 显式绑定到具体元素:
<header>...</header>
<main v-bind="$attrs">...</main>
<footer>...</footer>
5. 在 JS 中访问透传属性
在 <script setup> 中使用 useAttrs API:
<script setup>
import { useAttrs } from 'vue';
const attrs = useAttrs();
</script>
在没有 setup 语法糖的写法中,通过 setup 的上下文访问:
export default {
  setup(props, ctx) {
    console.log(ctx.attrs); // 透传的属性
  },
};
依赖注入:跨层级通信的利器
Q: Props 逐级传递有什么痛点?依赖注入如何解决?
A: 当组件嵌套层级很深时,props 需要逐级向下传递,中间组件被迫接收不关心也不使用的 props,形成了「props 透传地狱」。使用 Pinia 全局状态管理可以解决,但如果不引入 Pinia,**依赖注入(Provide/Inject)**是 Vue 内置的优雅方案。
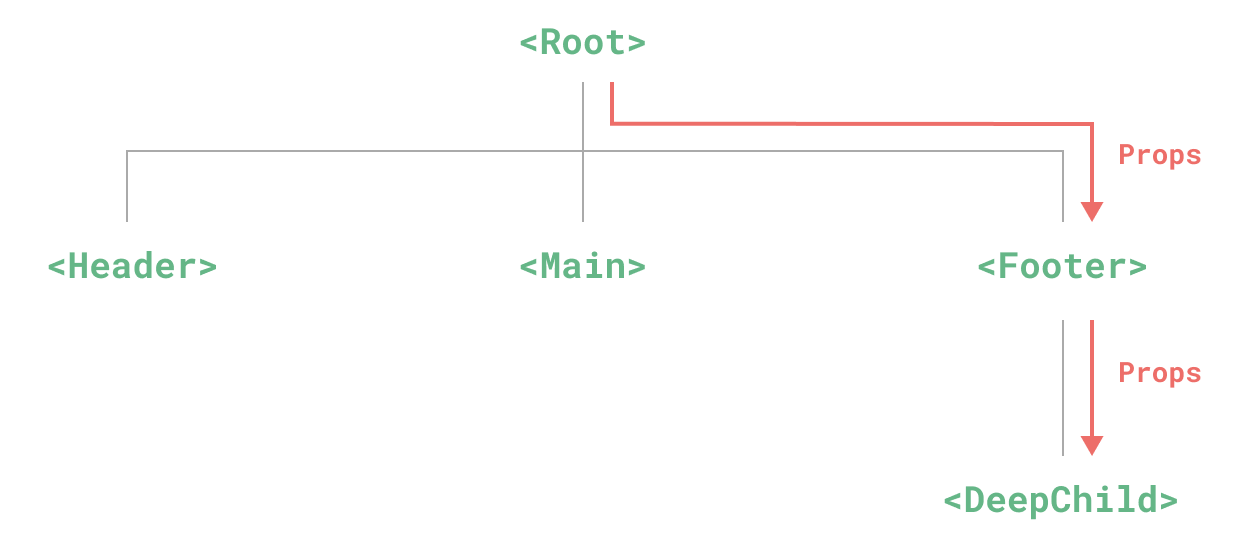
依赖注入分为两个角色:提供方(Provide)负责提供数据,注入方(Inject)负责接收数据。
基本用法
提供方:
<script setup>
import { provide } from 'vue';
provide('message', 'hello!'); // 注入名: 数据名, 值: 实际数据
</script>
注入方:
<script setup>
import { inject } from 'vue';
const message = inject('message');
</script>
关键细节
1. 必须在 setup 中同步调用
Vue 的依赖注入机制需要在组件初始化期间同步建立依赖关系,确保所有组件在渲染前已获取必要的依赖数据。如果没有使用 setup 语法糖,必须确保 provide 和 inject 在 setup 方法中同步调用。
2. 全局依赖
在应用级别提供的数据在整个应用的所有组件中都可以注入:
// main.js
import { createApp } from 'vue';
const app = createApp({});
app.provide('message', 'hello!');
3. 注入默认值
注入方可以设置默认值,类似于 props 的 default:
const value = inject('message', '这是默认值');4. 响应式数据的提供
提供的值可以是任意类型,包括响应式数据。需要注意的是,如果提供 ref 值,注入进来的不会自动解包。推荐的做法是将响应式变更的代码保留在提供方组件内:
<script setup>
import { provide, ref } from 'vue';
const location = ref('North Pole');
function updateLocation() {
  location.value = 'South Pole';
}
provide('location', { location, updateLocation });
</script>


<script setup>
import { inject } from 'vue';
const { location, updateLocation } = inject('location');
</script>
<template>
  <button @click="updateLocation">{{ location }}</button>
</template>
如果希望暴露只读数据,可使用 readonly 包装:
import { ref, provide, readonly } from 'vue';
const count = ref(0);
provide('read-only-count', readonly(count));
5. 使用 Symbol 作为注入名
大型应用中建议使用 Symbol 作为注入名以避免命名冲突,推荐在单独文件中导出:
// keys.js
export const myInjectionKey = Symbol();

// 提供方
import { provide } from 'vue';
import { myInjectionKey } from './keys.js';
provide(myInjectionKey, { /* 要提供的数据 */ });

// 注入方
import { inject } from 'vue';
import { myInjectionKey } from './keys.js';
const injected = inject(myInjectionKey);
组合式函数:有状态逻辑的复用
Q: 组合式函数和普通工具函数、以及 Vue2 的 mixin 有什么区别?
A: 组合式函数(Composables)本质上是一种代码复用方式。它和组件的区别在于:
- 组件:对结构、样式、逻辑进行复用
- 组合式函数:侧重于对有状态的逻辑进行复用
快速上手:鼠标追踪器
// hooks/useMouse.js
import { ref, onMounted, onUnmounted } from 'vue';

export function useMouse() {
  const x = ref(0);
  const y = ref(0);

  function update(event) {
    x.value = event.pageX;
    y.value = event.pageY;
  }

  onMounted(() => window.addEventListener('mousemove', update));
  onUnmounted(() => window.removeEventListener('mousemove', update));

  return { x, y };
}
在任意组件中使用:
<script setup>
import { useMouse } from './hooks/useMouse';
const { x, y } = useMouse();
</script>
<template>
  <div>当前鼠标位置: {{ x }}, {{ y }}</div>
</template>
vs Vue2 mixin 的三大优势
组合式函数解决了 mixin 的三个固有问题:
| 问题 | mixin | 组合式函数 |
|---|---|---|
| 数据来源不清晰 | 多个 mixin 的属性来源难以分辨 | 通过解构赋值,来源一目了然 |
| 命名空间冲突 | 多个 mixin 可能注册相同属性名 | 解构时可以取别名,如 { fetchData: fetchDataA } |
| 隐式跨 mixin 交流 | mixin 之间通过 this 隐式共享数据 |
通过函数参数显式交流,逻辑清晰 |
异步状态管理
组合式函数也非常适合封装异步请求逻辑。例如封装一个 useFetch:
import { ref, watchEffect, toValue } from 'vue';

export function useFetch(url) {
  const data = ref(null);
  const error = ref(null);

  const fetchData = () => {
    data.value = null;
    error.value = null;
    fetch(toValue(url))
      .then((res) => res.json())
      .then((json) => (data.value = json))
      .catch((err) => (error.value = err));
  };

  watchEffect(() => { fetchData(); });

  return { data, error };
}
当传入的 url 是响应式数据时,watchEffect 会自动追踪变化并重新请求。
约定和最佳实践
- 命名:以
use开头,驼峰命名法(如useMouse、useFetch)。 - 输入参数:注意参数是响应式数据的情况,使用
watch()显式监视或watchEffect()中调用toValue()。 - 返回值:返回普通对象(每项是 ref),以保证解构后依然保持响应式。若希望以对象属性形式使用,可用
reactive再包装一次。 - 副作用:在
onUnmounted中清理副作用(如移除事件监听器)。 - 使用限制:只能在
<script setup>或setup()钩子中同步调用,确保组件实例初始化时所有状态正确设置。
异步组件与 Suspense
Q: 什么是异步组件?如何在不同场景下使用它?
A: 异步组件指的是在需要时才加载的组件,是实现懒加载、优化首屏性能的关键手段。
基本用法
通过 defineAsyncComponent 定义异步组件:
import { defineAsyncComponent } from 'vue';

const AsyncCom = defineAsyncComponent(() => import('./MyCom.vue'));
ES 模块的动态导入返回 Promise,天然与 defineAsyncComponent 配合。
实际场景
假设 App.vue 中同时引入了 Home 和 About 组件,这会导致启动时立即加载所有组件。改用异步组件:
<script setup>
import { shallowRef, defineAsyncComponent } from 'vue';

const currentComponent = shallowRef(null);

const loadComponent = (name) => {
  currentComponent.value = defineAsyncComponent(() =>
    import(`./components/${name}.vue`)
  );
};
</script>
<template>
  <button @click="loadComponent('Home')">访问主页</button>
  <button @click="loadComponent('About')">访问关于</button>
  <component :is="currentComponent" v-if="currentComponent"></component>
</template>这样只有用户点击按钮时才会发出网络请求加载对应组件,实现了按需加载。
高级配置项
defineAsyncComponent 支持传入配置对象进行精细控制:
const AsyncComp = defineAsyncComponent({
  loader: () => import('./Foo.vue'),
  loadingComponent: LoadingComponent, // 加载中显示的组件
  delay: 200,                         // 延迟显示 loading,避免闪烁(默认 200ms)
  errorComponent: ErrorComponent,     // 加载失败时显示的组件
  timeout: 3000,                      // 超时时间(默认 Infinity)
});这些配置项能有效提升用户体验——在网络状况良好时,delay 可以避免 loading 组件的闪烁;在网络异常时,errorComponent 提供友好的降级展示。
Suspense:统一管理异步依赖
Suspense 是 Vue3 新增的内置组件,用于在组件树中协调对异步依赖的处理。当组件树中有多个嵌套的异步组件时,如果不加处理,页面上可能出现多个分散的 loading 状态,在不同时间点显示内容。
Suspense 可以在顶层统一处理加载状态,它有两个插槽:
#default:所有异步依赖完成后才展示的内容#fallback:任意异步依赖未完成时展示的后备内容
<Suspense>

  <Dashboard />

  <template #fallback>
    正在加载...
  </template>
</Suspense>
Suspense 可等待两种异步依赖:
- 带有
async setup()钩子的组件(包括<script setup>中使用顶层await的组件) - 异步组件
内置组件嵌套顺序
当 Suspense 与 Transition、KeepAlive 配合时,推荐的嵌套顺序如下:
<RouterView v-slot="{ Component }">
  <template v-if="Component">
    <Transition mode="out-in">
      <KeepAlive>
        <Suspense>
          <component :is="Component"></component>
          <template #fallback> 正在加载... </template>
        </Suspense>
      </KeepAlive>
    </Transition>
  </template>
</RouterView>
Suspense 还会触发三个事件:pending(进入挂起状态)、resolve(default 插槽完成)、fallback(显示后备内容),可用于更细致的状态监听。
总结
本文覆盖了 Vue3 中四个重要的高级特性。属性透传让未声明的属性自动继承到根元素,减少了样板代码;依赖注入通过 Provide/Inject 机制打破了 props 逐级传递的限制,配合 Symbol 注入名可安全用于大型项目;组合式函数借助 setup 语法糖优雅地解决了有状态逻辑的复用问题,相比 Vue2 的 mixin 在数据来源清晰度、命名冲突和跨模块通信方面都有质的提升;异步组件配合 Suspense 实现了组件级别的懒加载和统一的异步状态管理。这些特性共同构成了 Vue3 高级开发的基石。